Microscopic examination in microbiology
Ⅰ. Introduction
The analysis of a sample taken for diagnostic purposes is generally a cytological and bacteriological analysis. Thus, microscopic examination is a key step in the diagnostic process for bacterial infections.
Objectives :
- Provides information on the presence of bacteria confirming the bacterial origin of an infection, which represents a major element for appropriate therapeutic management
- Orients on a family of bacteria or a bacterial genus, making it possible to adapt or modify an antibiotic therapy.
- Depending on the sample or the clinical context, it can in some cases, in a few minutes, identify a pathogen with almost certainty.
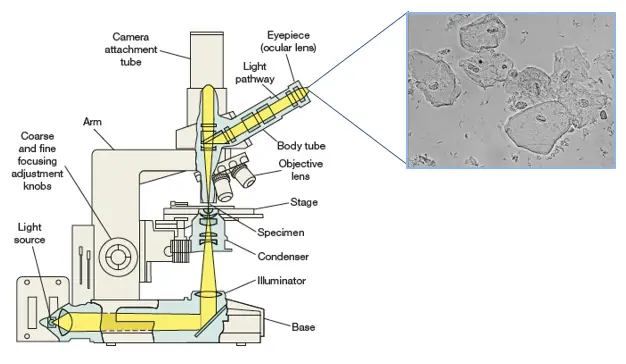
Ⅱ. Brightfield optical microscopy
The brightfield optical microscope forms a dark image on a bright background.
In a brightfield microscope, light (mirror or electric light) is focused onto the sample plane by a condenser located under the stage. The lens magnifies the object forming a real magnified primary image. This in turn is magnified by the eyepiece. The total magnification is equal to the eyepiece multiplied by the objective. Thus, with a x40 objective and a x10 eyepiece, the total magnification will be 400 times.
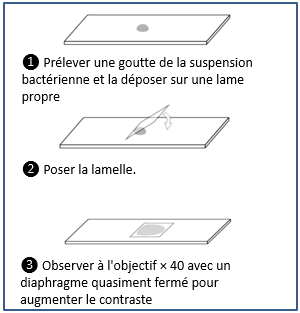
Microscopic examination in bacteriology can be carried out without staining the sample by direct observation between slide and coverslip, or after staining
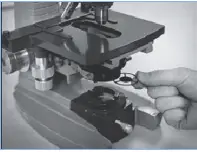
Wet Mount
Methods based on the wet mount technique correspond to the observation of a biological material or a bacterial suspension between
slide and coverslip without prior fixation.
Qualitative study
Examination of microorganisms in the wet mount state is useful for:
- Observe cellular activities such as motility and binary fission.
- See natural cell sizes and shapes,
Quantitative study
- It makes it possible to answer the number of figurative elements present in the liquid samples per unit of volume (cubic millimeter or microlitre, millilitre).
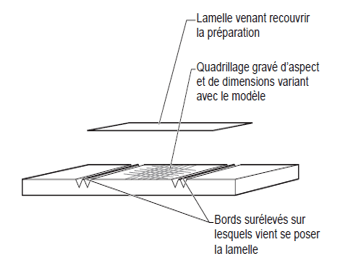
- The hemacytometers commonly called cells are used for this purpose.
These thick glass slides dug with channels, present a particular grid on the slightly lowered central platform. Covered with a coverslip placed on the raised side platforms, a very precise and known volume is used to count the cells of the biological fluids.
- How to choose between the Malassez hemacytometers, the Thoma hemacytometers and the Nageotte hemacytometers ?
- - Liquids with a high cellular density (blood): hemacytometers of Mallasses or Thoma.
- - CSF and urine (low cell density): Nageotte hemacytometers.
- - In fact, this choice is of no real importance: it depends above all on the operator's experience.
A. If the liquid to be analyzed is haemorrhagic
- Before counting cells other than red blood cells, it is best to lyse the red blood cells by diluting the hemorrhagic fluid to 1/2 with a 0.5% solution of acetic acid in water.
- Do not forget to multiply by 2 (dilution factor due to the acetic acid solution) the counting result.
B. If a high number of hemacytometer is expected
- Dilute the liquid to be analyzed: 1/2 or 1/5 or 1/10 or more, in physiological saline.
- Do not forget to multiply the result of the count by the dilution..
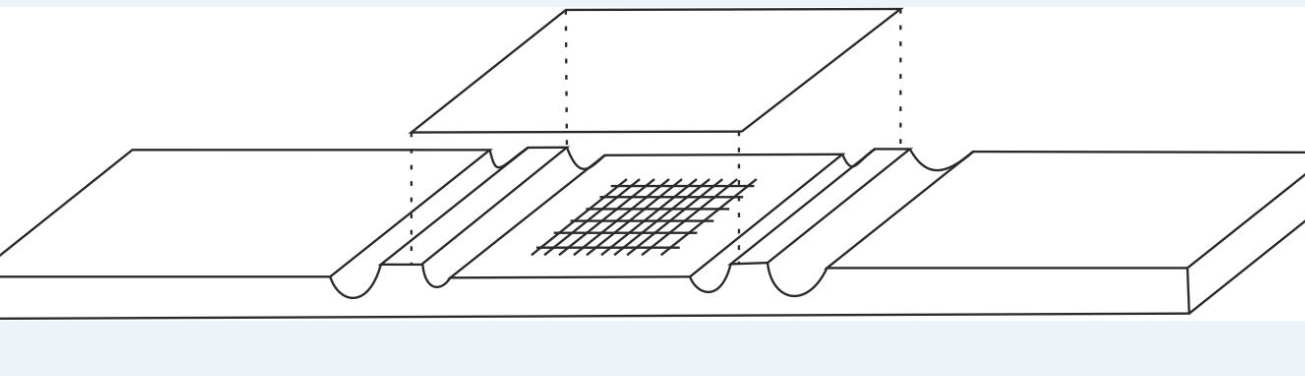
C. Before charging the hemacytometer:
- Place a coverslip on the cell: for the Malassez cell: flat coverslip,
- Place the hemacytometer on a horizontal surface,
- "Glue" the cover slip to the hemacytometer, moistening the two edges of the cover with a small, clean, wrung-out damp cloth,
- Slide the coverslip across the width of the hemacytometer and check that the "hemacytometer - coverslip" adheres well.
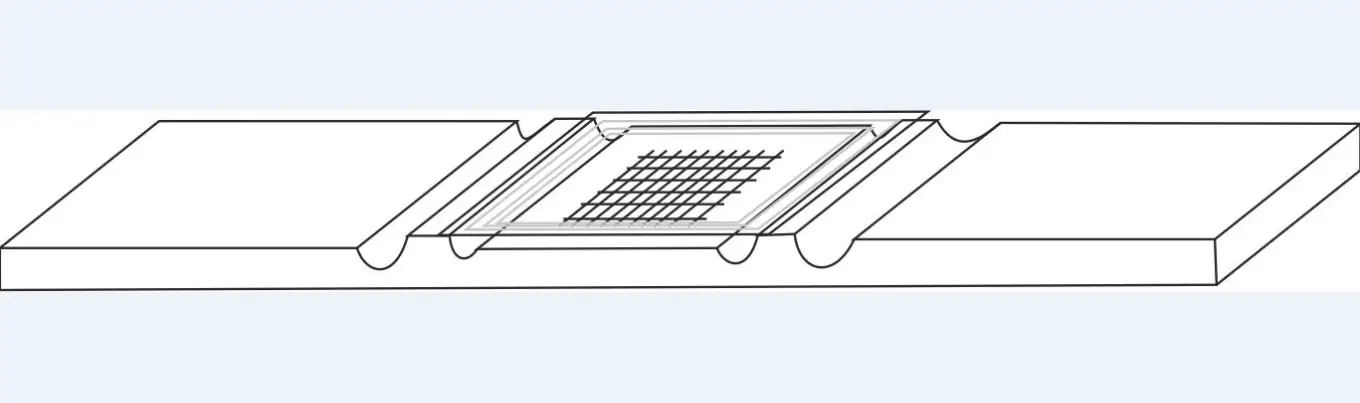
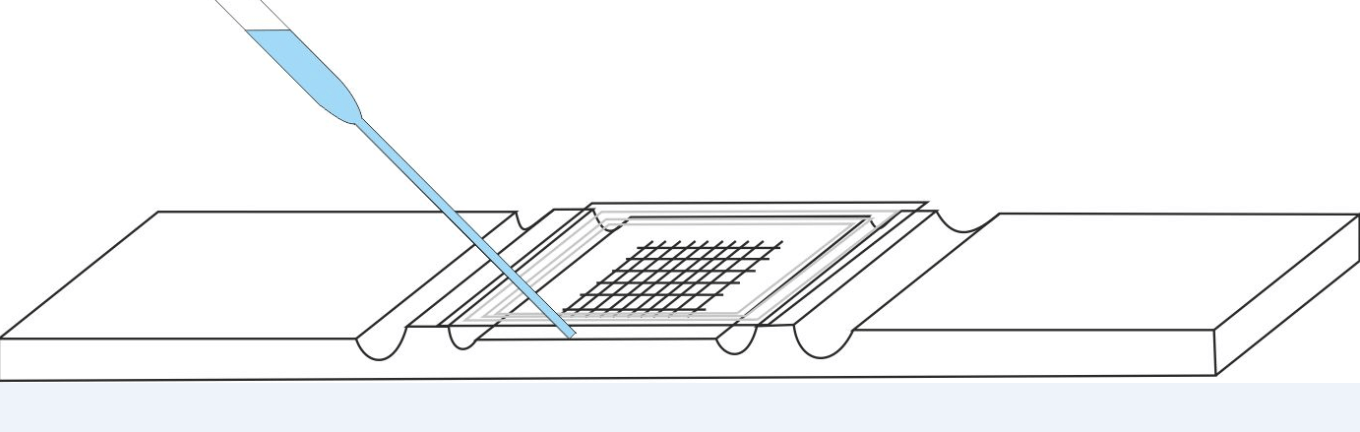
D. Introduce the liquid to be analyzed into the hemacytometer :
- Homogenize the liquid to be analyzed (or its dilution),
- Between the cell and the coverslip, let in, by capillarity, a drop of the sample to be counted, using a Pasteur pipette. The drop must not overflow into the channels of the hemacytometer and the drop must cover completely and at once the entire squared surface of the hemacytometer.
Wait at least 5 - 10 minutes, the cell well horizontal, in a humid chamber (for example a Petri dishe with folded and wet paper at the bottom), before starting the count (the cellular elements must sediment).
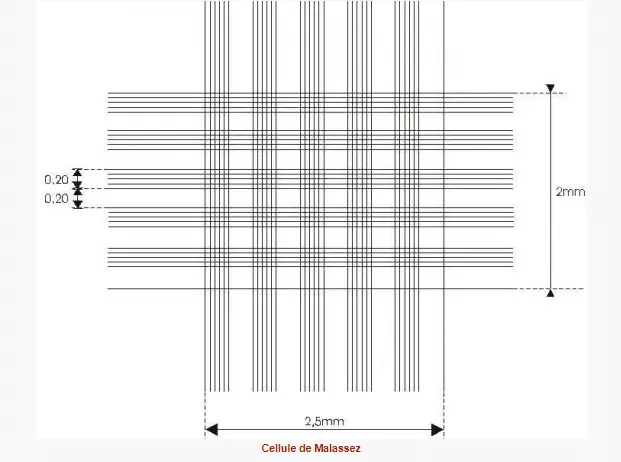
Malassez hemocytometer
Louis-charles Malassez, French scientist born in Nevers 1842-1909. Malassez is known for the invention of the hemocytometer, a tool to quantitatively measure the number of blood cells.
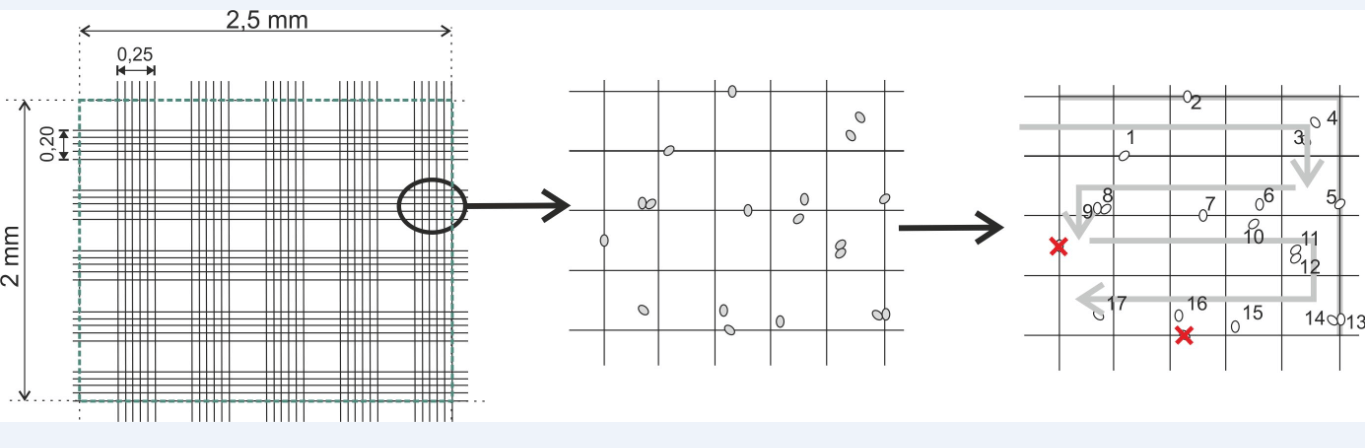
        •The total grid has a volume of 1 µl.
        •Dimensions: L: 2.5 mm, W: 2 mm, H (or depth): 0.20 mm.
        •Consisting of 100 rectangles of equal surfaces.
☰ Before counting :
- - Make an observation with the x10 objective not only to identify the grid but also to check that the cells to be counted are evenly distributed; if the homogeneity is deemed insufficient, you have to start all over again, i.e. load a new hemocytometer from the re-homogenized suspension
- - Switch to the x40 objective to perform the count
☰ For items that overlap lines, count all that overlap lines on the left and top. Do not count any element that overlaps the rows on the right and bottom.
☰ The grid therefore consists of 10 vertical stripes 0.25 mm wide and 10 horizontal strips 0.20 mm wide forming thus 100 rectangles, we will only count the cells in 10 of the 25 non-contiguous rectangles taken at random in the cell.
☰ We then sum the cells observed in each rectangle, we divide this number by 10 (number of rectangles counted), we thus obtain the number of cells per rectangle, just multiply the number obtained by 100 to know the number of cellular entities per mm3
Astuce:la moyenne de 4 à 5 rectangle et on la multiplie par 100
Example of counting:
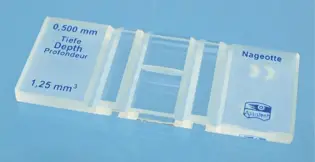
Nageotte hemocytometer
- Jean Nageotte, Born in Dijon 1866-1948. He was a doctor at the Salpêtrière and a professor at the Collège de France. In 1902, he carried out cerebrospinal fluid count tests and considered the need to use a hemocytometer that could contain at least 100 mm3 of fluid.
    -The total grid consisting of: 40 strips (Each strip has a volume of 1.25
    microlitre)
    - Dimensions of a strip: L: 10 mm, W: 0.25 mm, H (or depth): 0.50 mm
☰ counting :
- Let n be the number of elements counted (red blood cells or leukocytes)
- N the number of elements per microliter (µl)
- V the counting volume: V = 5 µl (4 strips of 1.25 µl)
⇒ N=n/V
Tip: the number of elements in 4 bands (5mm) the total number is divided by 5 (number /mm ) or the average of 3 multiplied by 0 ,8
If counting carried out on diluted liquid: do not forget to multiply the number of elements counted must be multiplied by the dilution rate.
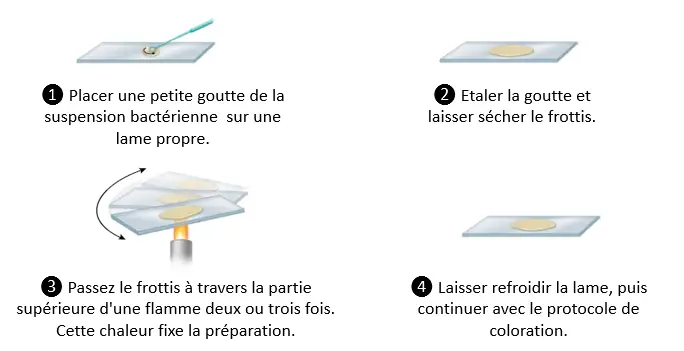
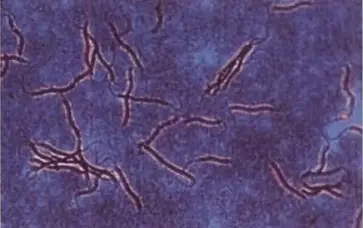
Examination after staining
- The techniques most commonly used in the medical bacteriology laboratory involve staining.
- The preparation is fixed on a slide and then stained.
☵ Methylene blue stain Go
☵ Gram stain Go
☵ Ziehl-Neelsen stain Go
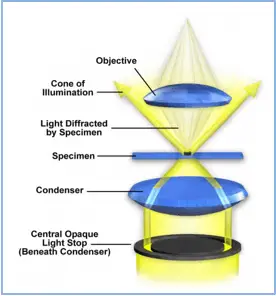
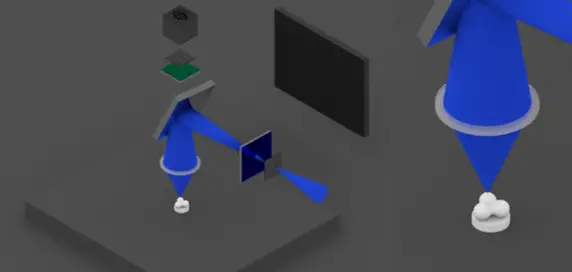
Ⅱ 2) Dark Field Optical Microscopy
The dark field microscope makes it possible to obtain from transparent samples, with low contrast, well-resolved, contrasted images, without requiring prior staining of the object.
Even living samples are observable like this.
It leads to a dark background of the image, against which the structures to be observed stand out brightly.
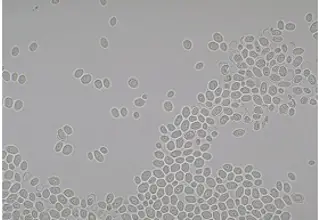
Saccharomyces cerevisiae observed under a bright field microscope
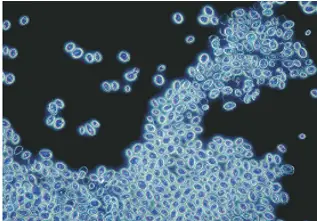
Saccharomyces cerevisiae observed under a dark field microscope
Principle
Objects not only absorb light, but also deflect some of it. If the lighting is arranged so that the direct, undeviated rays do not reach the objective, the observer sees only deviated rays. Only the light deflected by the sample reaches the objective. The background of the image therefore appears dark, while the objects in the sample appear bright.
The diaphragm has a transparent rim or ring, and causes the condenser to only receive light from the sides. The internal part of the capacitor is not illuminated.
- The light coming from the condenser is focused on the plane of the sample. In order to penetrate the objective, the light must have been deflected by the sample to be observed, and it thus forms an image with clear structures. The undeflected light passes completely past the lens aperture, and the image background remains dark.
Applications
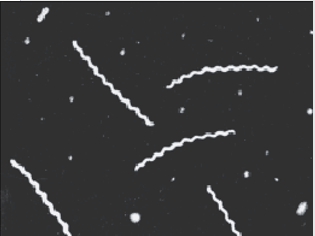
Spirochetes are not visualized by conventional microscopy because their diameter is less than the resolving power of an optical microscope, but are observable by dark field microscopy, at ×1000 magnification or more.
Advantages
- It makes it possible to observe mobile treponemes, with regular and refracting turns.
Disadvantages
- This method does not allow the differentiation of pathogenic treponemes from saprophytic treponemes (present at the level of the cutaneous-mucous coverings) and requires an experienced sampler and reader.
Ⅱ -3) Phase Contrast Optical Microscopy:
History
This instrument was developed by Dutch physicist Frederik Zernike in the 1930s, earning him the Nobel Prize in Physics in 1953.
Definition
Transforms differences in refractive indices between two structures into contrast levels, which translate into phase differences for light waves passing through them.
- Thus visualizes transparent structures when their refractive index differs from that of their neighborhood.
- Allows observation of samples with little or no contrast that cannot be observed with a brightfield microscope.
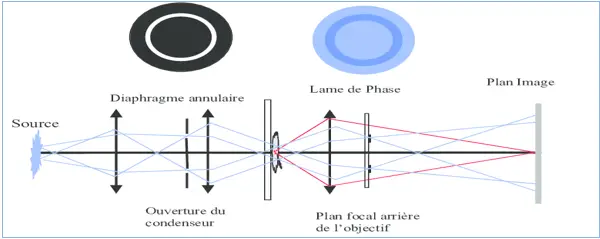
The light path in a phase contrast microscope
- These microscopes are equipped with specific objectives and a condenser for phase contrast (two devices, called phase rings, are placed one in the condenser and the other in the objective.
- The light that passes through the sample undergoes a phase shift with respect to the other light rays. The rings filter these out-of-phase rays and the result is an image with accentuated contrast (the existence of a bright halo around dark details).
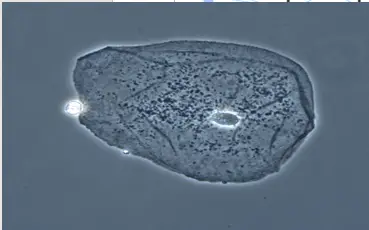
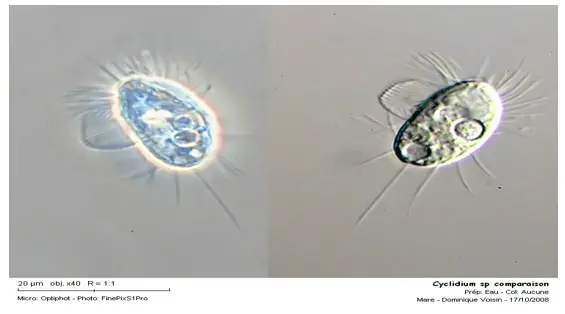
Photograph of an Epithelial Cell Seen by a Phase Contrast Microscope
Spirillum voltans under phase contrast microscopy
Application
-The phase contrast microscope can be used for unfixed, unstained samples.
- It is useful for visualizing the internal structures and organelles of bacteria, fungi and protozoa.
- In microbiology :
- It is specially used to detect bacterial constituents such as endospores, inclusions…….
- It is also used to study eukaryotic cells
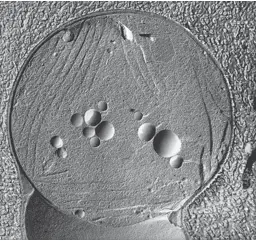
Clostridium botulinum with subterminal oval endospores under phase contrast microscope (X 600).
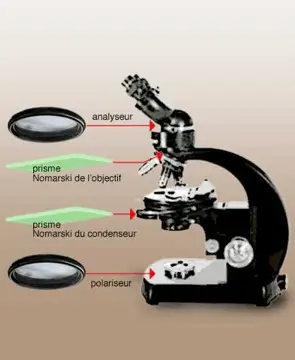
The interference contrast microscope (Nomarski Microscopy)
- Developed by physicist Georges Nomarski in the 1950s, with the invention of the prisms that bear his name.
- The interference contrast microscope is based on a different principle from that of the phase contrast microscope but produces the same type of image and has the same field of use
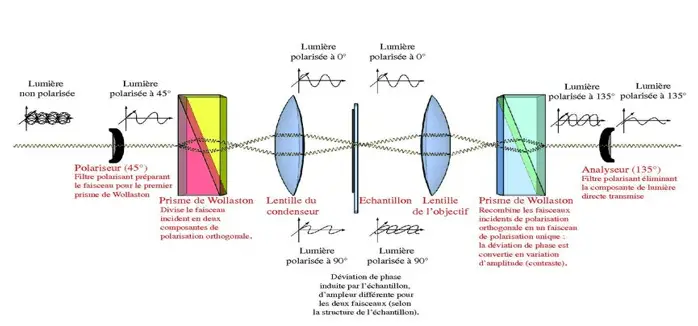
the path of rays in a CID microscope.
- prisms generate two rays of polarized light in planes perpendicular to each other. one ray passes through the specimen while the other passes through a clear area of the slide. After this passage the two rays are recombined and interfere with each other to form an image.
The image thus appears in three dimensions and with bright colors and we observe the difference between the MI and M C P
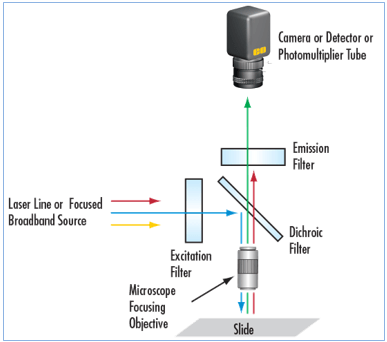
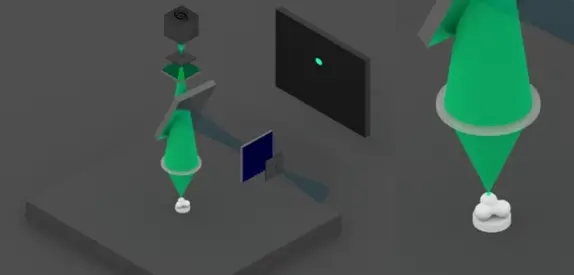
Ⅱ -4) Fluorescence optical microscopy
- Fluorescence microscopy is a technique using an optical microscope taking advantage of the phenomenon of fluorescence.
Fluorescence is the property possessed by certain bodies of emitting light after having absorbed photons of higher energy.
Once the energy of the photon has been absorbed, the molecule is then generally in an electronically excited state, denoted S'1. part of the energy is released as heat. The return to the ground state is accompanied by the emission of a photon very quickly.
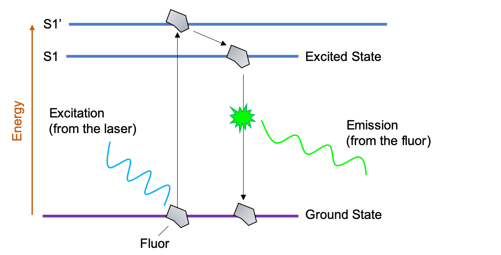
Fluorescence microscopy relies on forming an image by detecting this emitted light.
- The fluorescence microscope has the same elements as an optical microscope except:
- The light source that has special properties: the most used is the mercury vapor lamp.
- The presence of filters allowing spectral selection.
- The filters are used to select the wavelength range that you want to use to excite the fluorophores or that you want to recover to make an image.
From the light source the excitation light is directed down the microscope by the dichromatic mirror. This mirror reflects light of short wavelengths but allows the passage of light of long wavelengths.
The excitation light arrives at the specimen, stained with fluorochrome. The fluorochrome absorbs the excitation light energy and emits bright fluorescence. The emitted fluorescence rises through the objective lenses, passes through the dichromatic mirror and through a filter, which blocks any residual excitation light. An image is formed by detecting this emitted light.
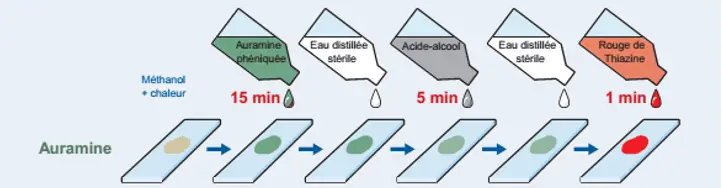
Application: Auramine staining
The principle of staining is the same as for Ziehl-Neelsen staining: staining of the bacilli with a solution of cold carbolic auramine for 15 minutes. After rinsing with distilled water, decolorization for 5 minutes with the acid–alcohol mixture is carried out. A counter-staining with a solution of thiazine red (1 minute) is carried out after a new rinsing with distilled water. The dried slides covered with a glass coverslip are observed using a fluorescence microscope at the × 25 objective.
Advantages
The auramine method quickly eliminates negative smears and is therefore of interest to laboratories carrying out large series.
Disadvantages
It requires expensive equipment and is only profitable for busy structures that process more than 50 slides/day.
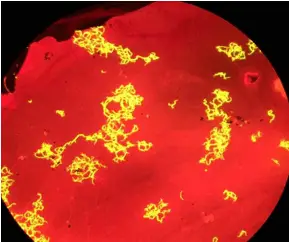
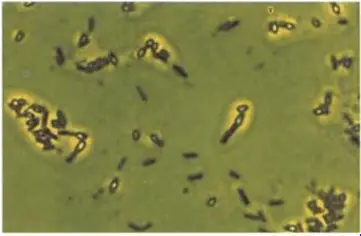
Mycobacteria appear as yellow fluorescent bacilli on a red background
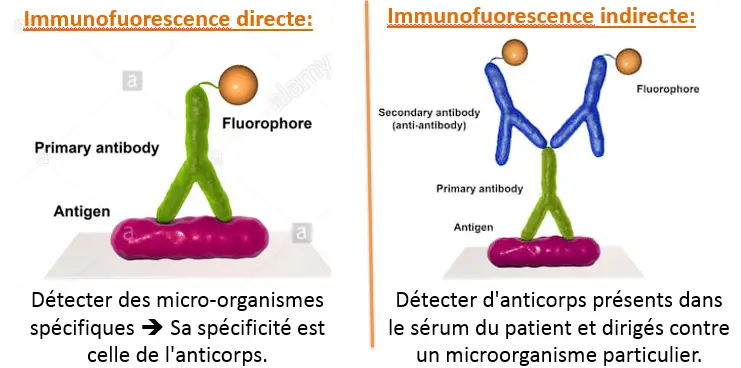
Immunofluorescence uses antibodies to which the fluorochromes are attached by covalent bonds on the Fc fragment so that the Fab fragment can still bind to his epitope
specific.
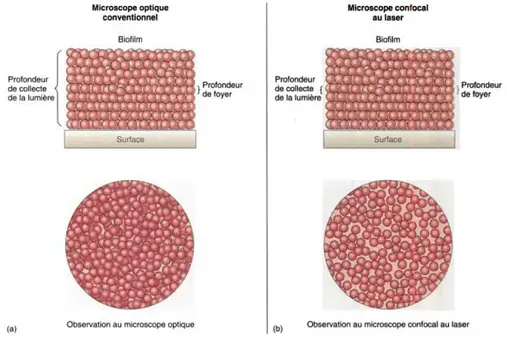
Ⅱ -5) Confocal microscope
- The conventional microscope which uses light with different wavelengths and illuminates a large area of the sample, will have a relatively high depth of field. Even if out of focus, images of bacteria at all levels of the field will be seen, including bacteria above, within, and below the focal plane.
The resulting image may therefore be scrambled, confused and cluttered. The solution to this problem is confocal microscopy, which allows the detection of fluorescent molecules with good three-dimensional spatial resolution.
1) Confocal microscope uses ultraviolet laser light beams to excite fluorescent chemical dye molecules,
Two diaphragms are placed in the light path.
The beam is focused only on a small part of the sample by the first diaphragm.
2) If the fluorophores are present at this point, they emit light, which is then filtered by the dichroic mirror and a filter.
A second diaphragm is placed at the focal point of the beam. It allows only the light coming from the target point to pass through the sample.
The lens therefore only detects this point.

3) Then either the sample or the optical assembly is moved. This allows the beam to be scanned over the sample surface to form the fluorescence image at a precise height.

4) The beam can then be moved vertically to obtain different cutting planes. Computer processing finally makes it possible to reconstruct the image in volume.
Ⅲ ) Electron microscopy
- The resolution limit of the optical microscope is about 0.2 µm.
- The detailed internal structure of microorganisms can only be studied by electron microscope.
- The resolution of ME is greatly increased because the wavelength is about 0.005 nm, 100,000 times shorter than that of visible light.
- With the electron microscope, close points of less than 5 or 0.5 nm can be distinguished and the usual magnification is greater than 100,000x

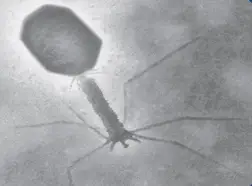
Images obtained by a/ Optical microscope (160X) and b/ electronic microscope (425X) of proteobacterium Spirillum volutans
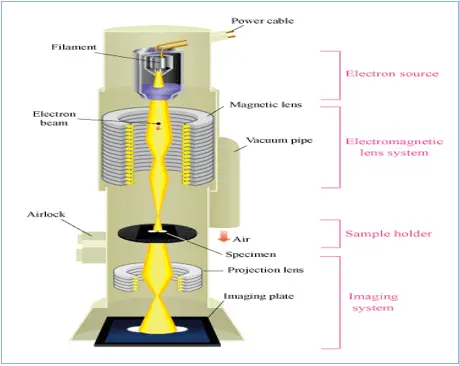
1- In the ME Electrons behave like light rays and can be focused, not by glass lenses, but by ring electromagnets
2- this slide shows the path of the electron beam in an electron microscope
3-The electron beam is produced by a tungsten filament. It is focused on the sample by an electromagnetic condenser. It is then magnified by an objective and a projection lens, both of which are electromagnets. Electrons strike a fluorescent screen to produce an image, or a photographic plate to
Ⅲ -1) Transmission electron microscope (TEM)
- MET can resolve objects as close as 1nm and magnify microbes up to 500,000X
- The particularities of TEM bring severe restrictions as to the nature and mode of sample preparation
- only very thin sections can be examined
- The sample should be 20-100nm thick, and it should be able to retain its structure after being bombarded with vacuum electrons
- Cells usually need to be stained before being examined under a microscope
The poisonous cyanobacterium Microcystis aeruginosa
(18,000X magnification), TEM
The negative stain
The sample is spread in a thin film with phosphotungstic acid or uranyl acetate, the heavy metals do not penetrate the sample but make the background black while the sample appears shiny on the picture
metallic shading
- It is coated with a thin layer of platinum or another heavy metal by evaporation at an angle of about 45° so that the metal is deposited on only one side of the microorganism
- The sample appears to be illuminated and forming a shadow
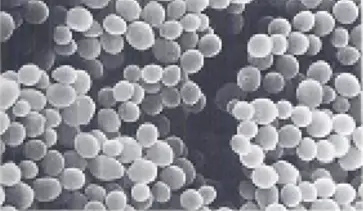
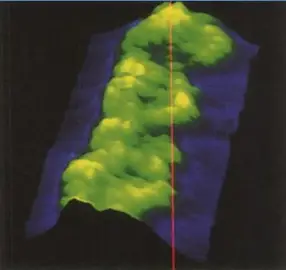
Ⅲ -2) Scanning electron microscope (SEM)
☰ The scanning electron microscope is used to examine the surface of microorganisms in detail
- SEM produces an image from the electrons refracted by the surface of the object rather than from the transmitted electrons.
- Sample preparation is very easy
- Before viewing, the dried specimens are mounted and coated with a thin layer of metal to prevent the accumulation of an electrical charge on the surface and to obtain a better image.
☰ A new class of microscopes called scanning probe microscopes
- Scanning probe microscopy determines surface characters by scanning the surface of the object with a point probe.
- The scanning tunneling microscope is a good example of a scanning probe microscope.
- It can reach magnifications of 100 million and allows scientists to see atoms on the surface of a solid.
- The electrons that surround the surface atoms direct or project a very short distance from the surface.
Ⅳ) Conclusion:
The elements collected from macroscopic and especially microscopic examination often provide very strong diagnostic arguments that will allow the initiation of appropriate therapy.
References:
- Microbiology laboratory theory & application, second edition, Michael J. Leboffe, Burton E. Pierce, 2012.
- Atlas de poche de microbiologie, Tony Hart, Paul Shears
- Prescott’s Microbiology, Joanne M. Willey, Linda M. Sherwood, Christopher J. Woolverton, tenth edition, 2017.
- Benson: Microbiological Applications Lab Manual, Eighth Edition.
- Microbiology PRINCIPLES AND EXPLORATIONS, Jacquelyn g. Black, Laura j. Black, 8th edition, 2012.
- Microbiologie, Prescott, Harley, Klein, 2ème édition française.
- Bactériologie médicale Techniques usuelles, François Denis, 3ème édition.